

As a game recorder
Record a game as a game recorder
You record the game data in one place. Teams, referees and league management then work with the same report.
Your next steps
Bring both teams’ details, the result, periods and events together in one game report. Check the recorded information and submit the report for review.
- 01
Check the game and your responsibility
Open a game you are authorised to record. Check the teams, schedule and both team sheets. Resolve missing player or coach details with the team representatives before completing the report.
- 02
Document the game
Save the result, played periods, goals, penalties and timeouts. Use confirmed information from timekeeping, penalty-bench officials and referees. Add the appropriate supplement when needed.
- 03
Hand the report over for review
Compare the final score and periods, then check the events and supplementary details. Submit the completed report with “Submit game report”. “Submitted” confirms the handover, not final approval.
You need approval for the specific game or a league assignment for the game day and venue. Saving individual details does not submit the report. Submission is neither referee review nor final result approval.
A look inside the application
This sequence follows the same report in the game recorder workspace. Form selections and saved results are explained separately. Supplement sheets are only needed when the actual game requires them.
The number in the screenshot matches the step. The arrow and frame show where to carry out the action.
Record game day → Released games
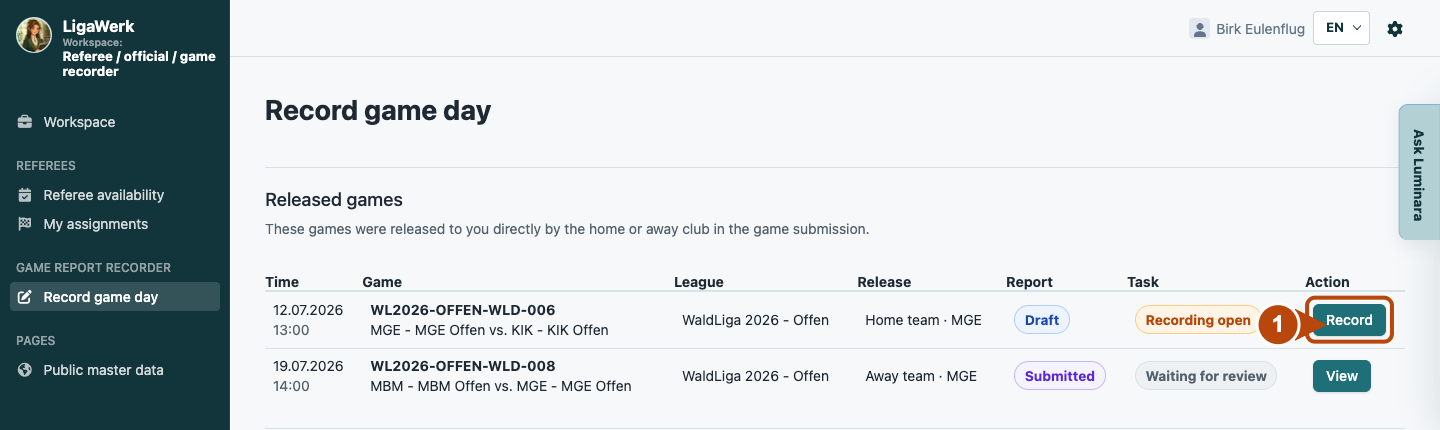
1 · Open a released game
- What you do
- Find the game by date and teams. Open an existing report with “Record” or a new one with “Create”. For a league assignment, open the game day with “Open” first.
- How to recognise the result
- Game report workflow opens for the selected game. The approval explains why you can edit this report.
Number one marks the entry to the specific game. Club approval and game-day/venue assignment are different access paths.
Game report workflow → Game header and team submissions
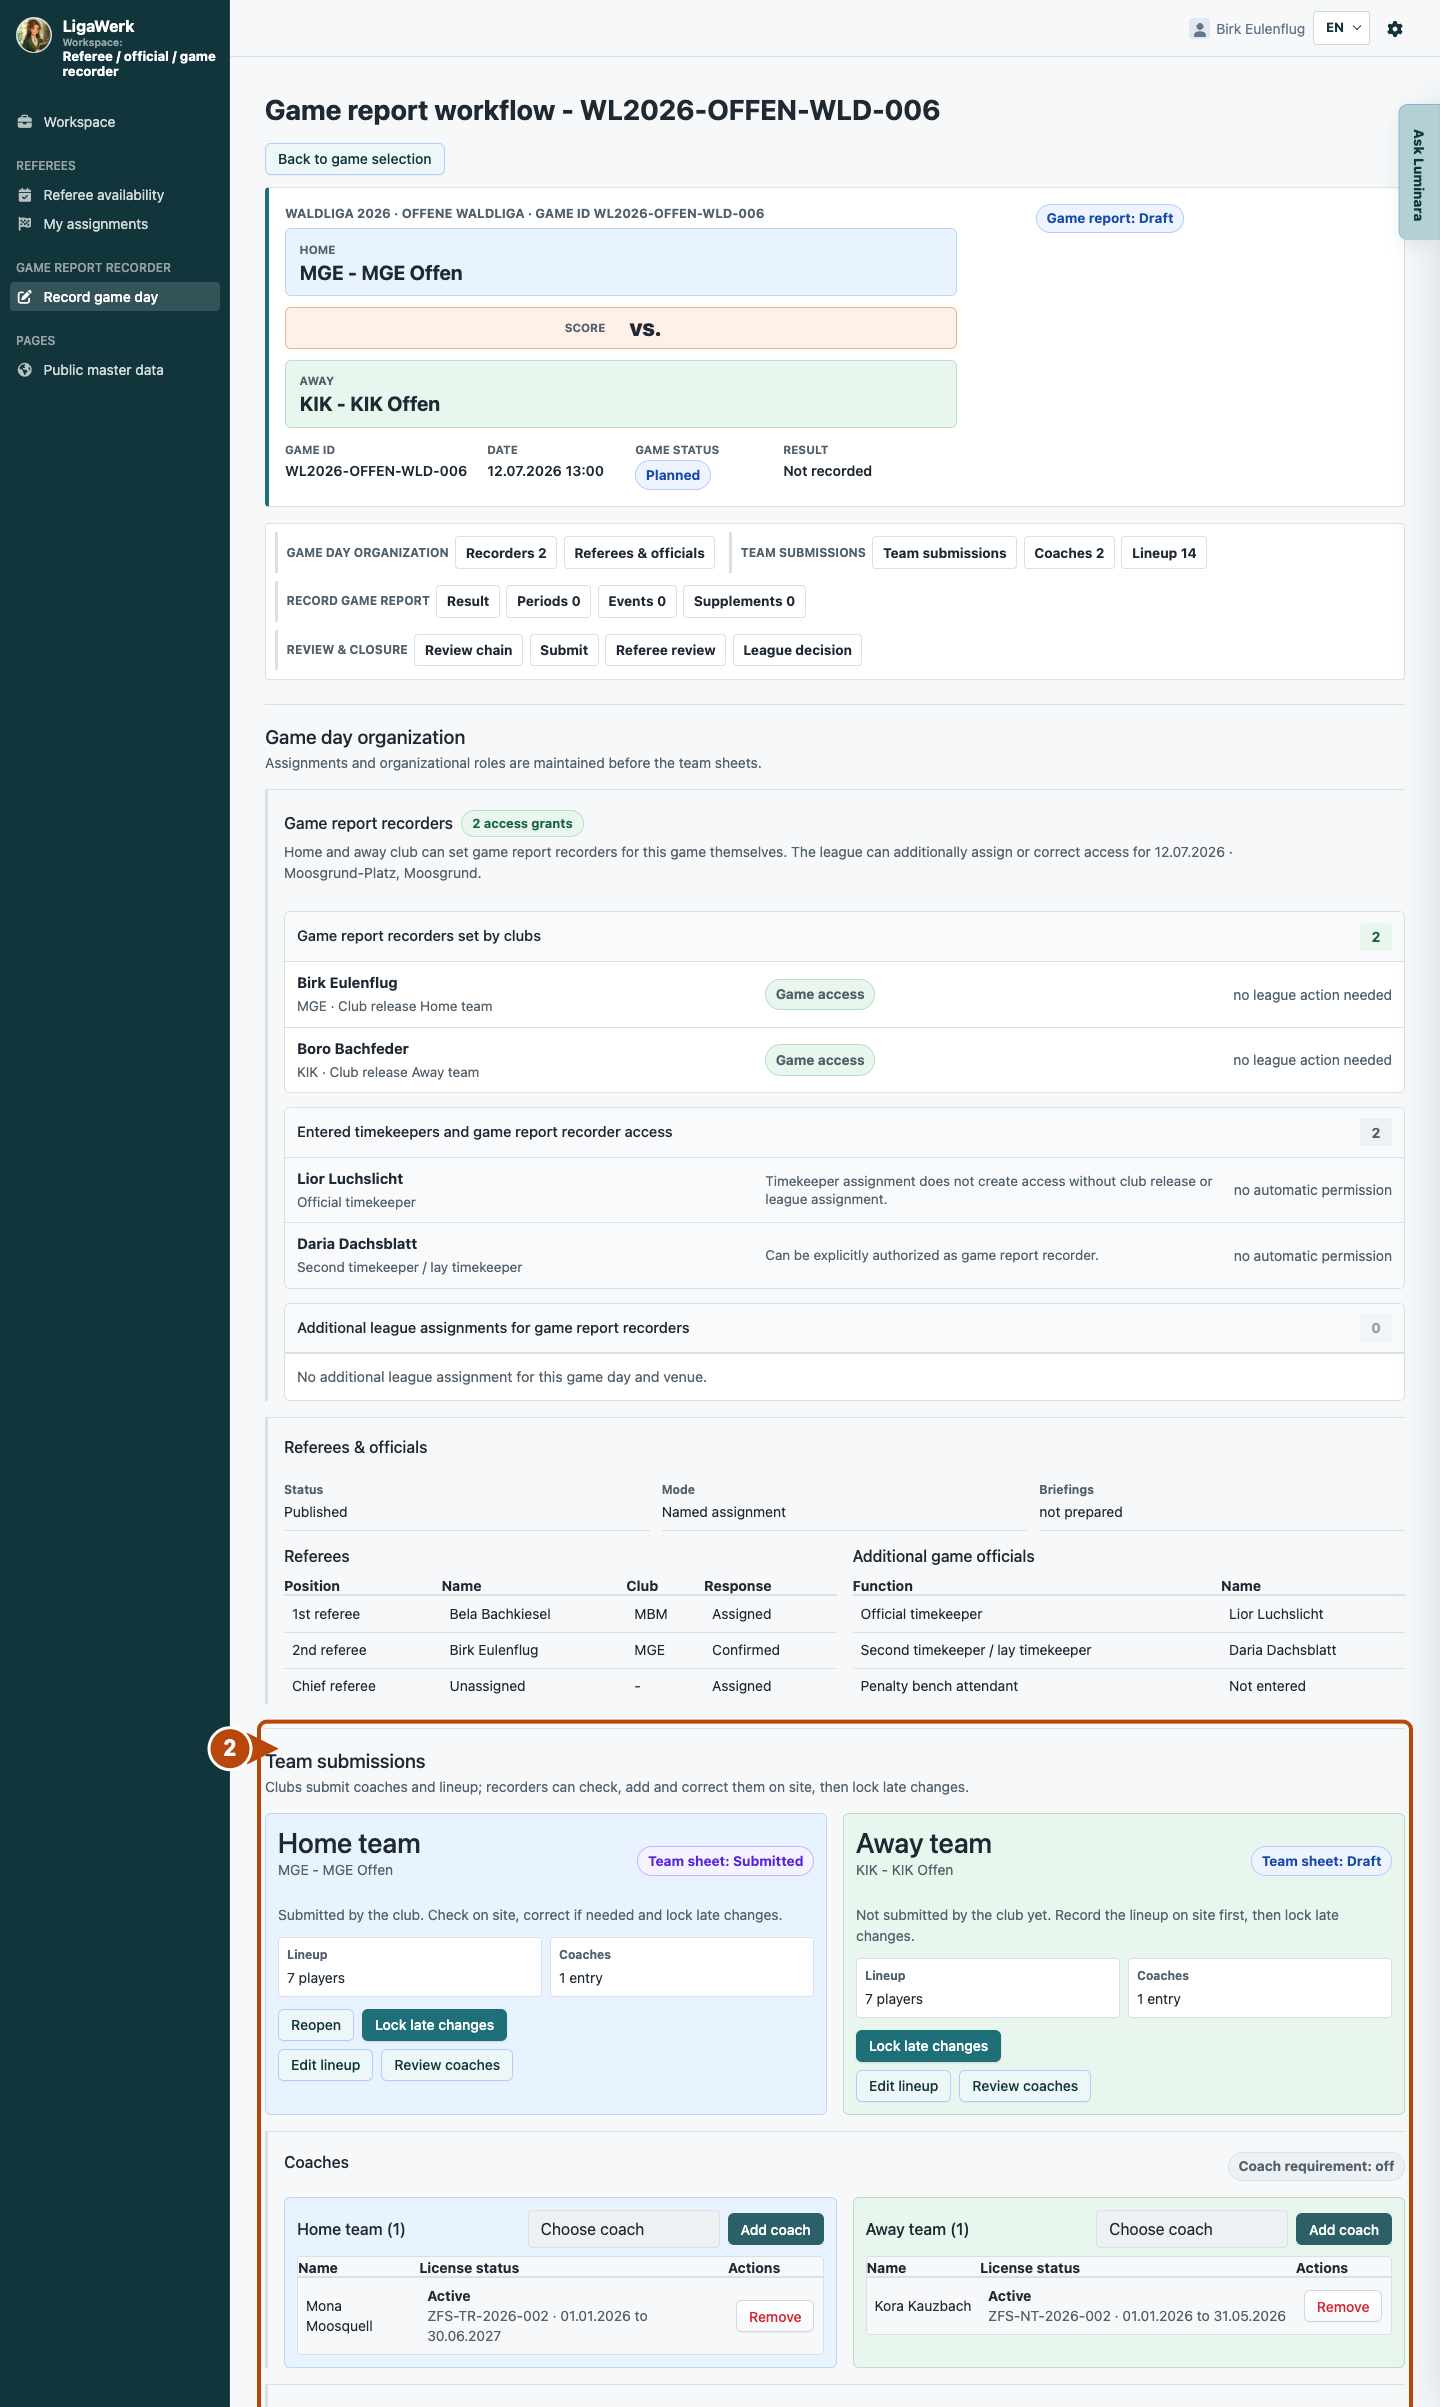
2 · Check the game and both team sheets
- What you do
- Check the teams and schedule. Compare the home and away team sheets, lineup status and coach details. Complete missing information within your permissions and clarify discrepancies with team representatives.
- How to recognise the result
- You can see which team has submitted its information and what still needs clarification. A submitted team sheet is not a submitted game report.
Number two covers both team sheets. This image shows existing information; no new team details are saved in this step.
Game report workflow → Result
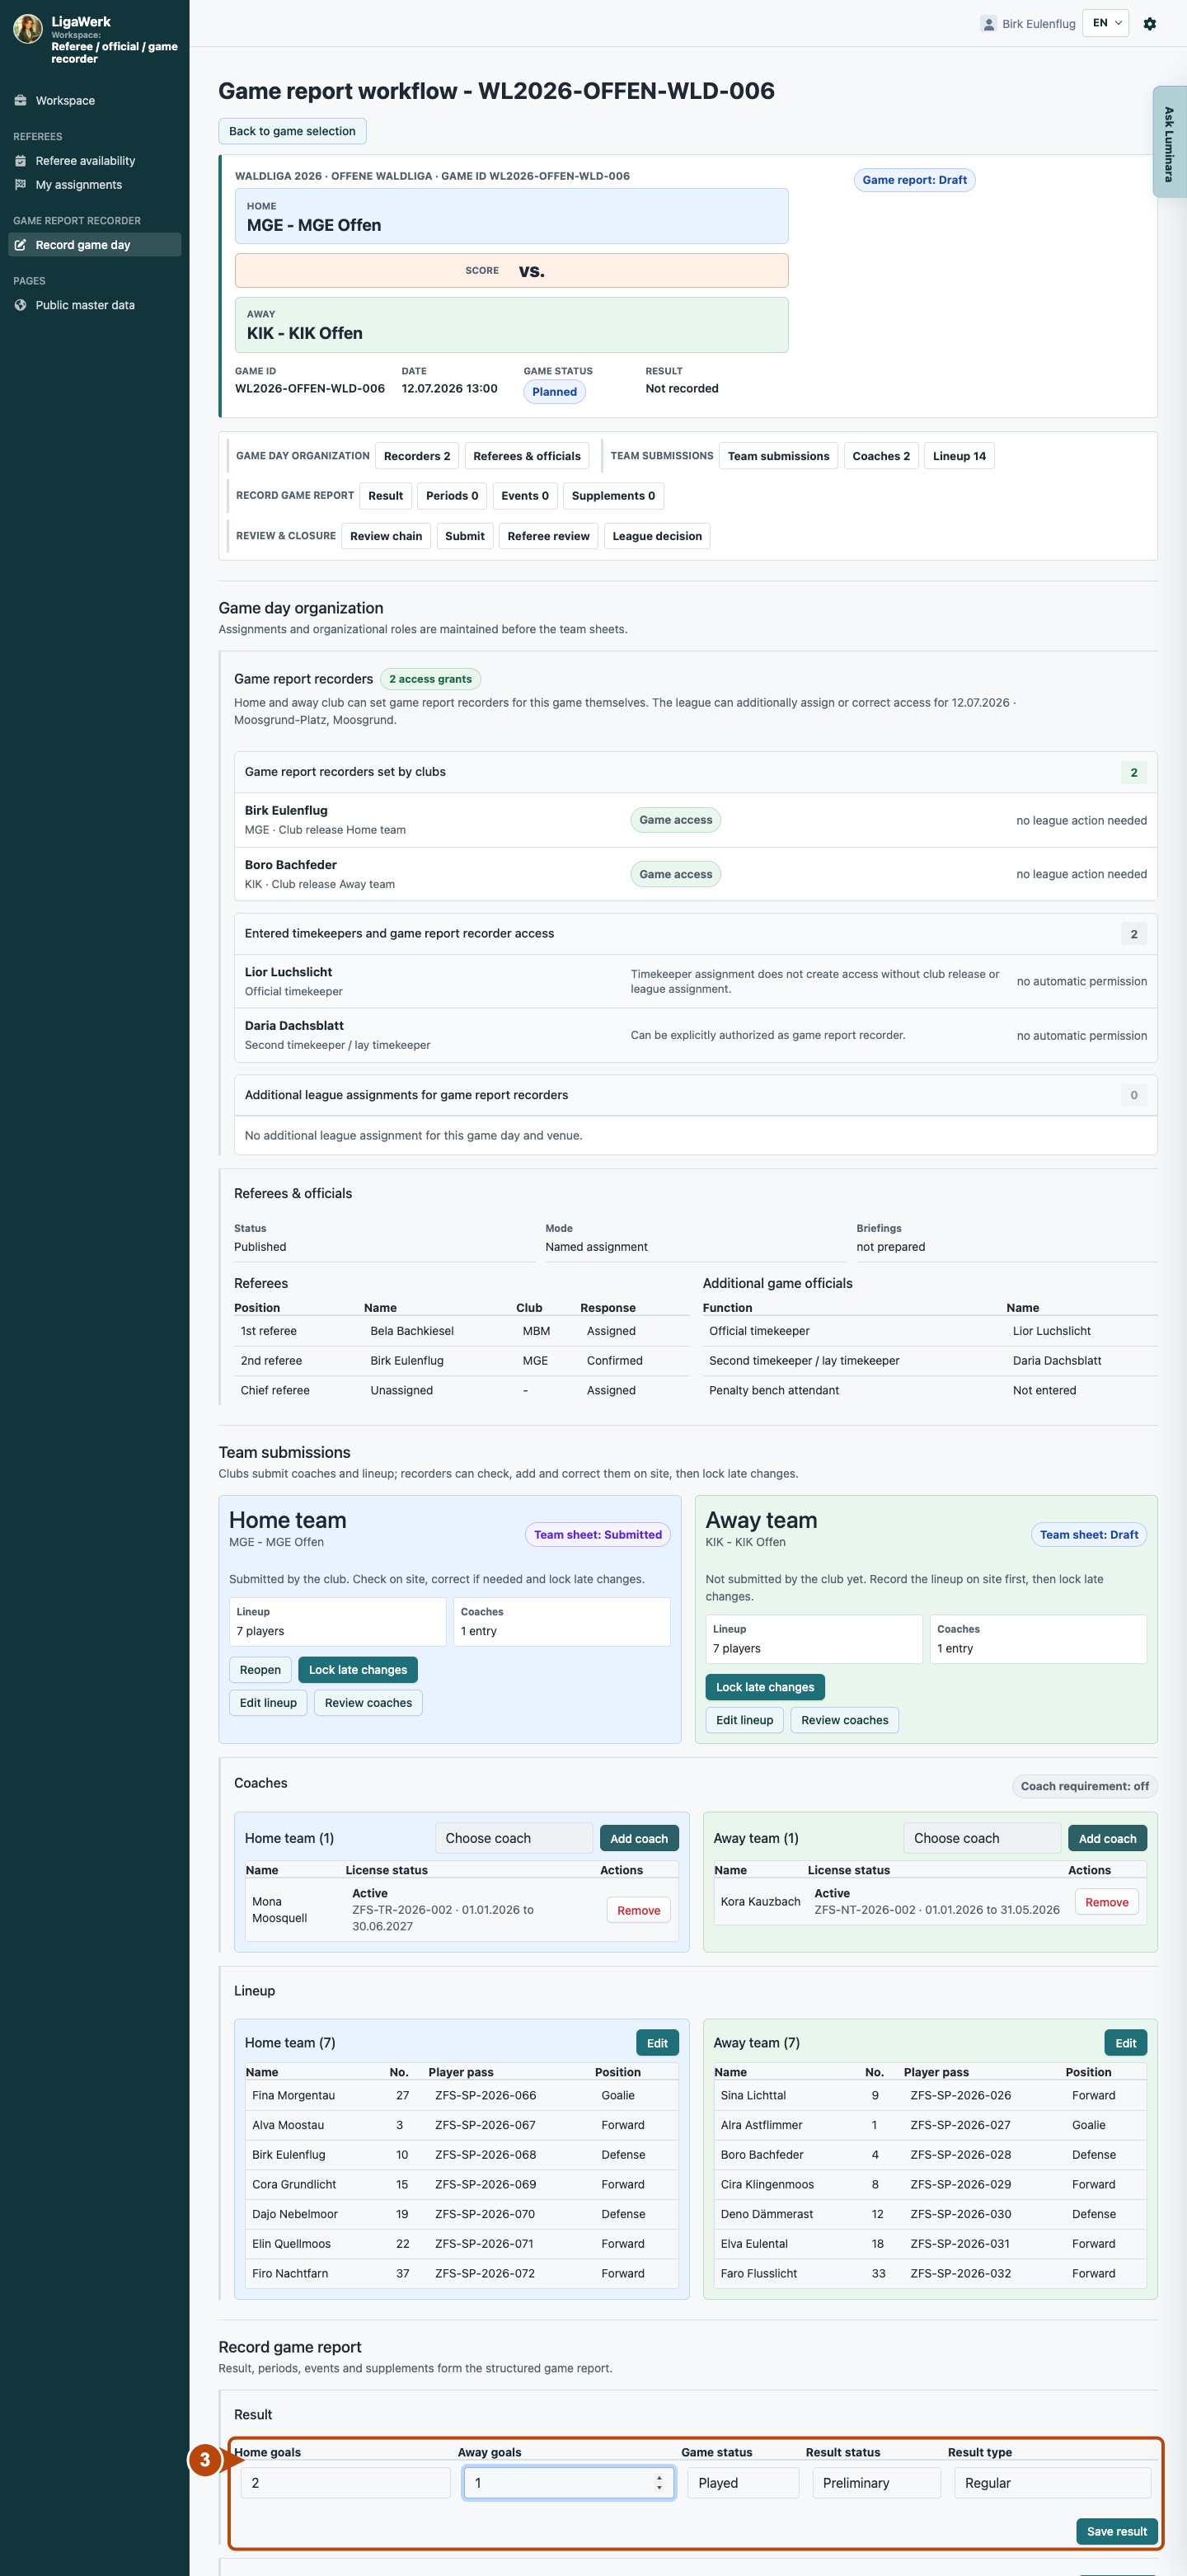
3 · Save the final score and statuses
- What you do
- Enter “Home goals” and “Away goals”. Select the actual “Game status”, suitable “Result status” and, if needed, “Result type”. Click “Save result”. The final league decision is a later step.
- How to recognise the result
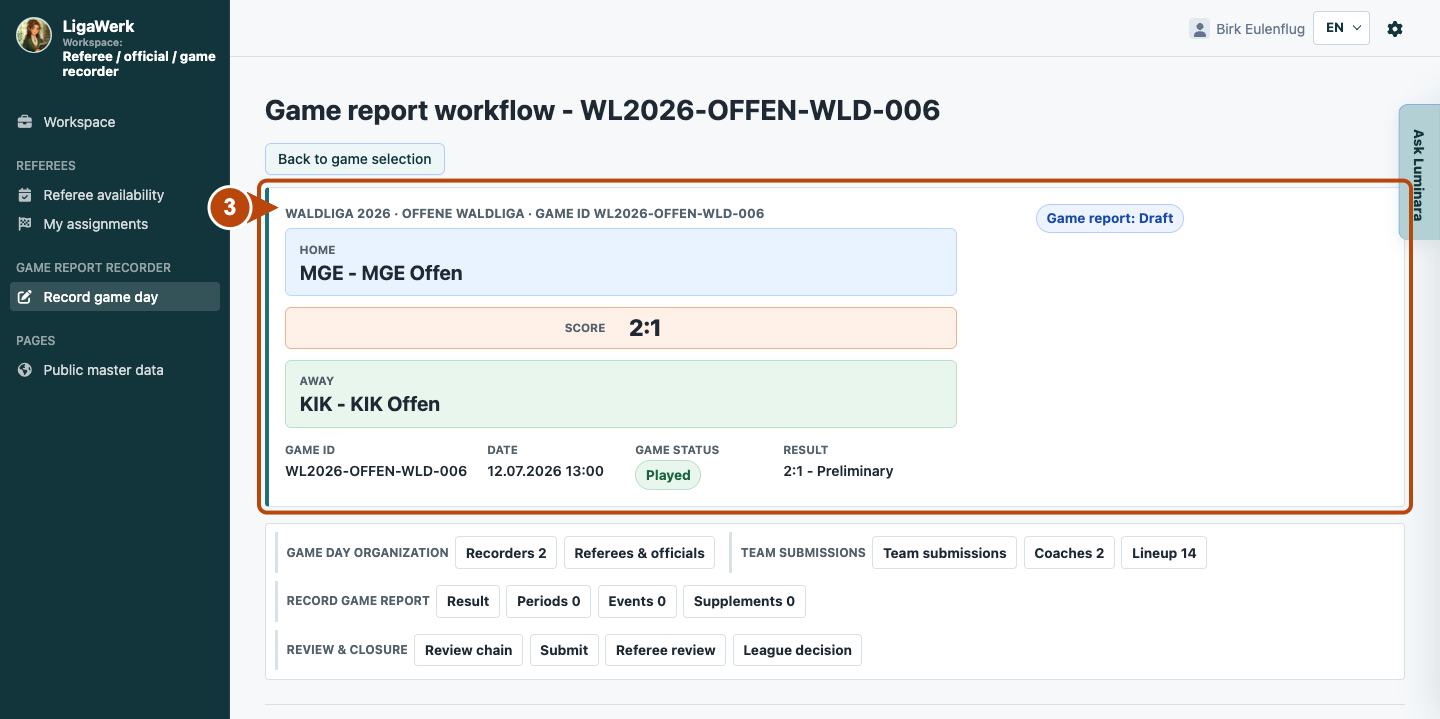
- The saved score and statuses appear in the game header. The result image shows the actual saved state; the report remains in recording.
Number three covers the result fields and save button. The long view retains the full game context; the result image shows the compact saved header.
View the saved score
Game report workflow → Periods → Add period
4 · Record the played periods
- What you do
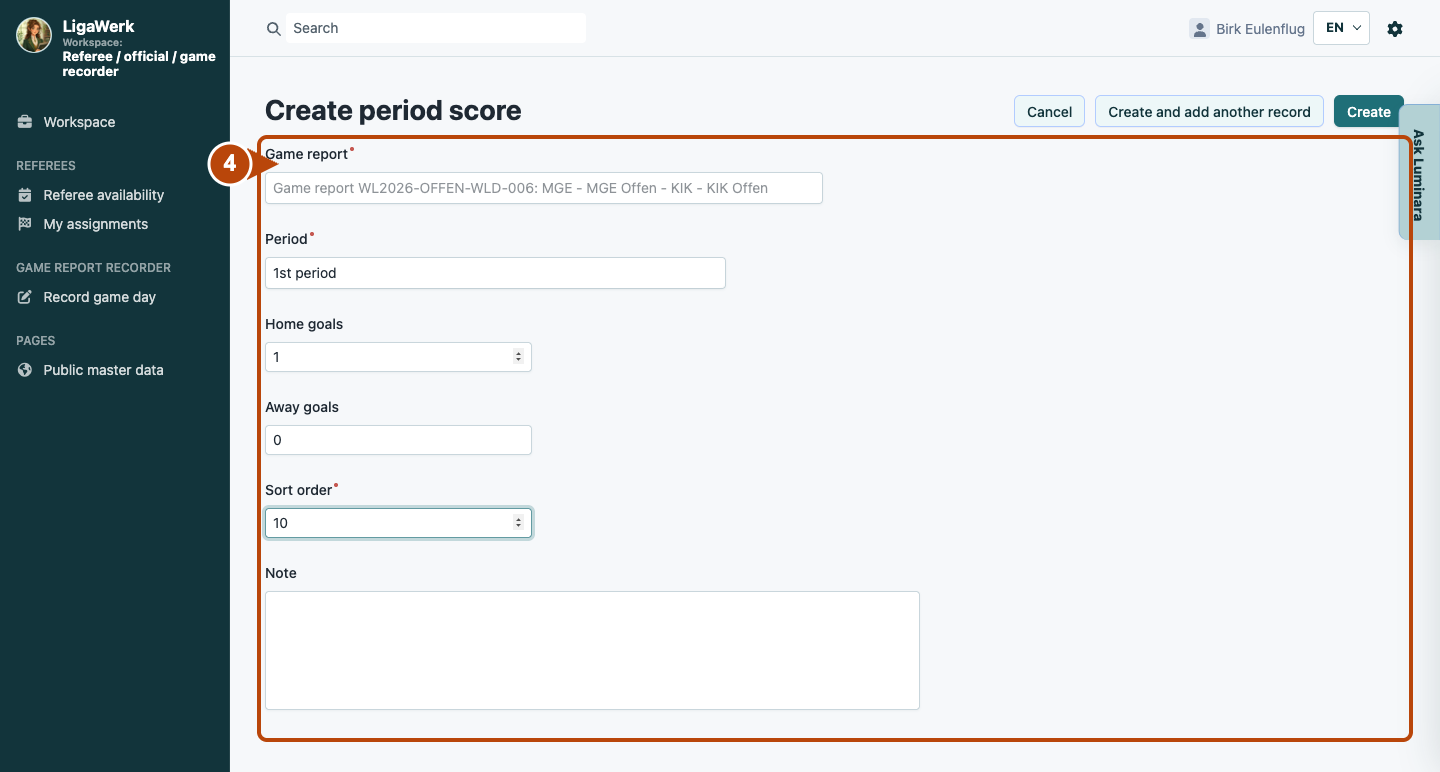
- Open “Add period”. Check the linked report, select the period and enter its home and away goals. Save with “Create” and repeat for each played period.
- How to recognise the result
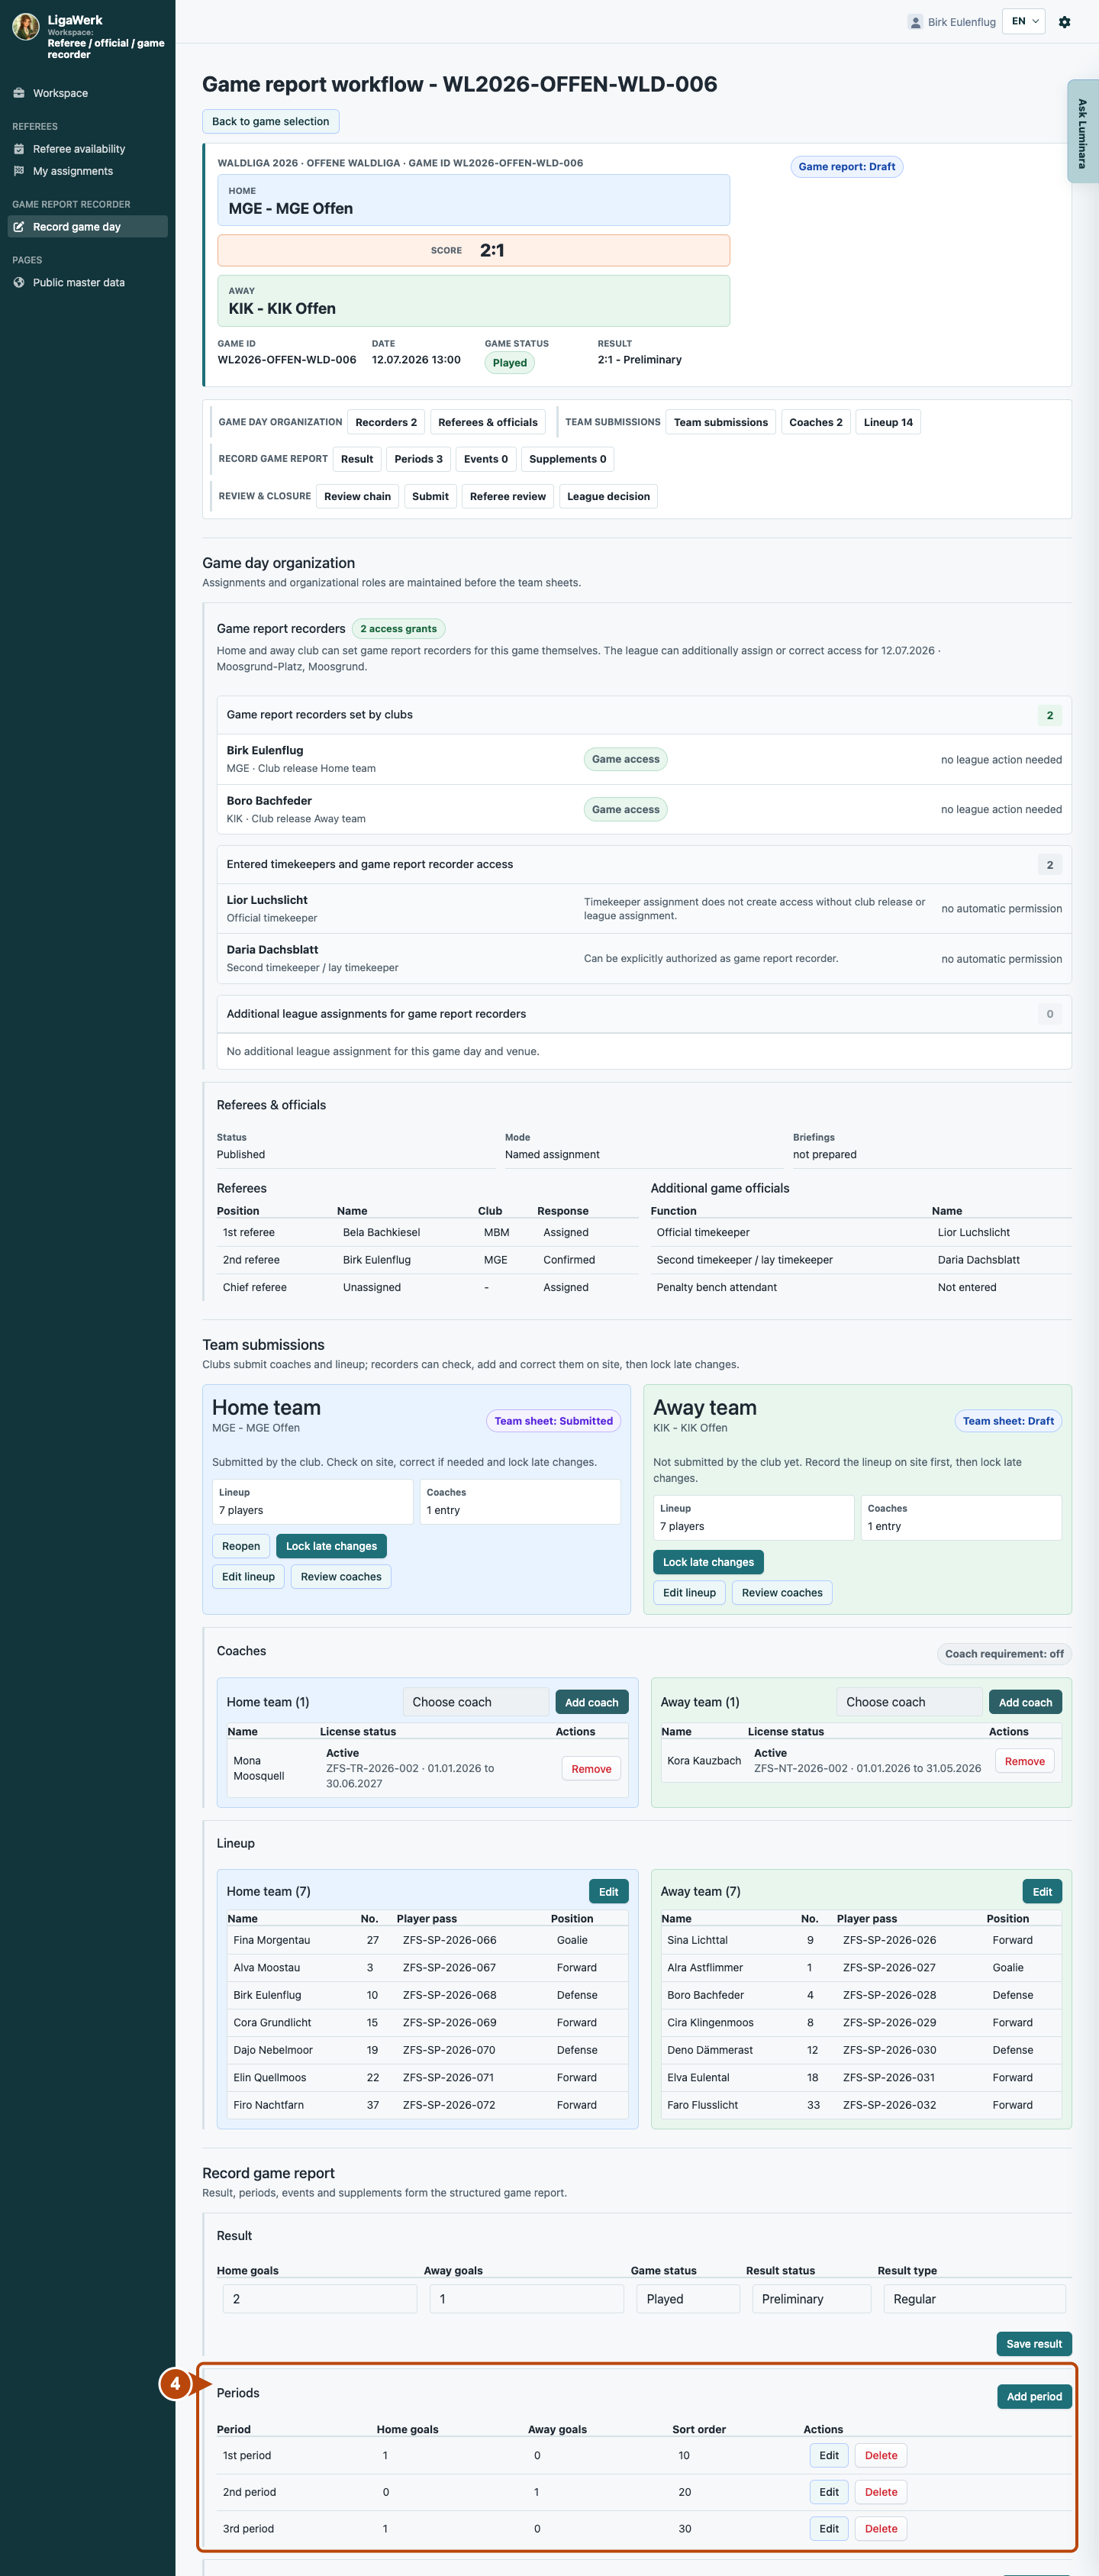
- The periods and their scores appear in the report. Compare their sum with the final score. The result image shows the actual saved periods.
Number four frames the native period form. Final score and period scores are saved separately; a selection alone creates no entry.
View the saved periods
Game report workflow → Events → Add event
5 · Document goals and timeouts
- What you do
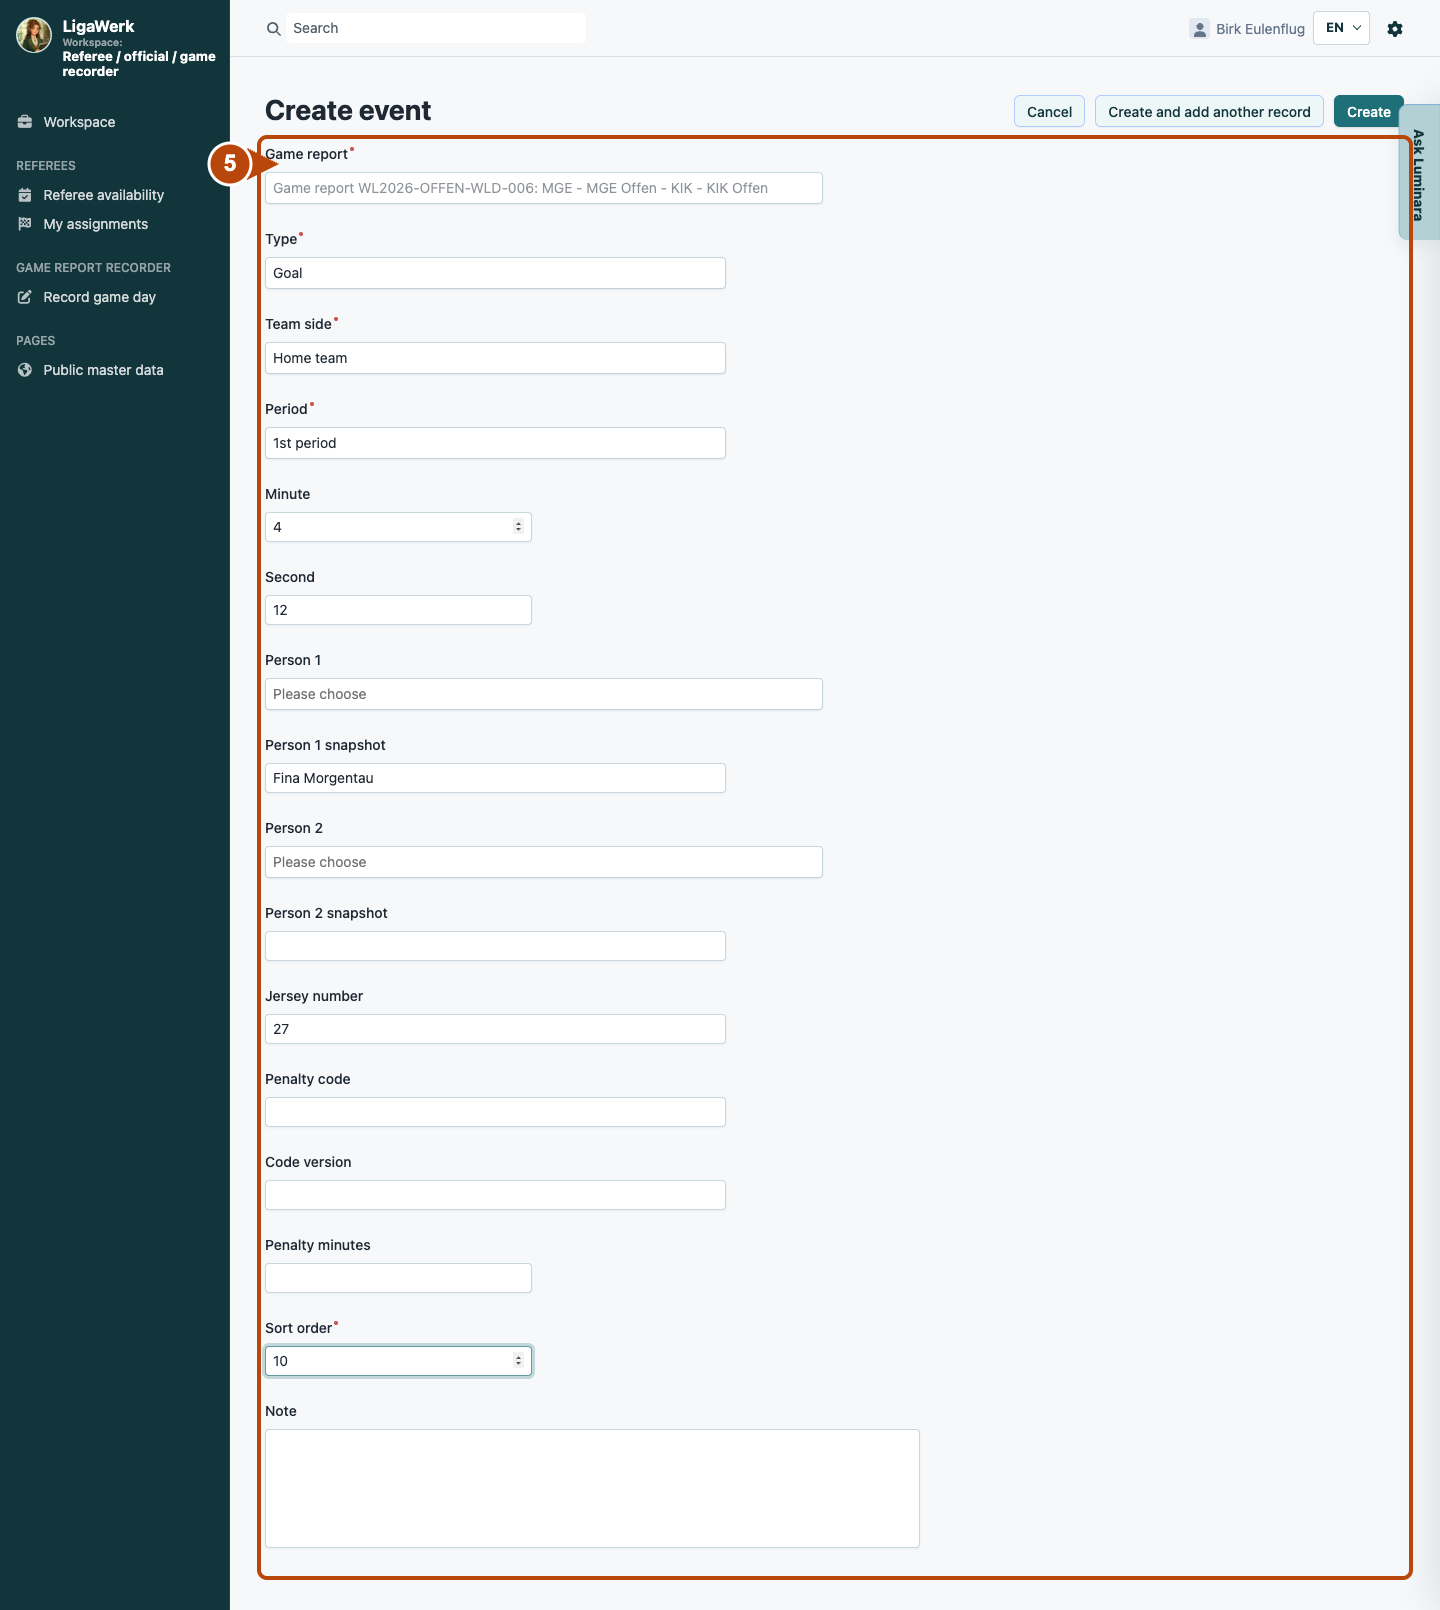
- Select “Goal” or “Timeout”, the team side and period. Enter minute, second and the required person details. Select an existing person or use the appropriate snapshot for confirmed details. Save with “Create” and check the report entry.
- How to recognise the result
- The saved event appears with type, team, period, time and person details. Repeat for confirmed events. Recording a goal does not automatically change the final score.
Number five shows the completed goal form before saving. Person and team must match the actual game; confirmed times come from timekeeping and referees.
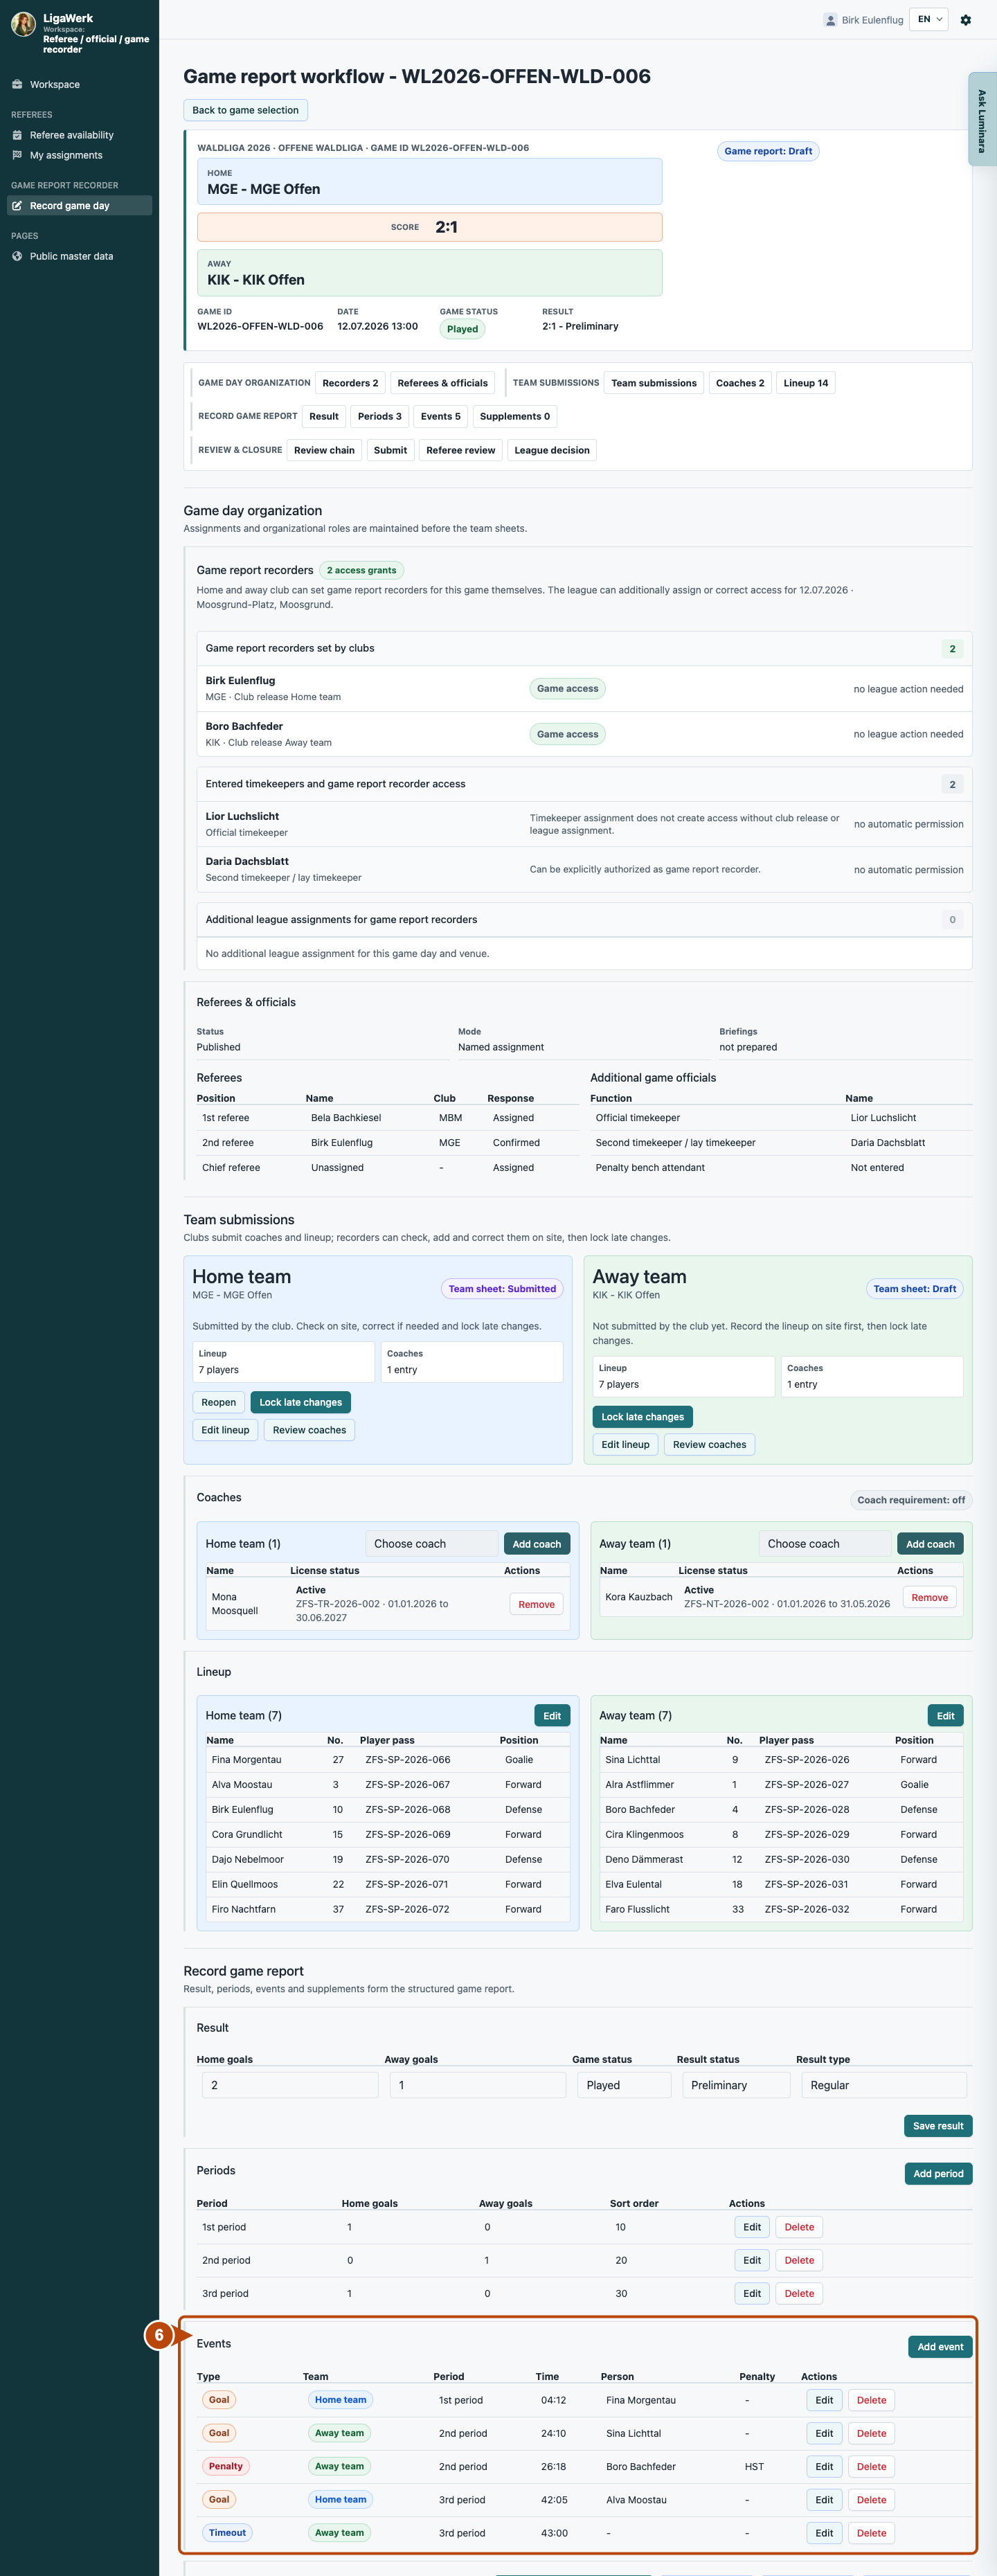
Game report workflow → Events → Penalty type
6 · Record complete penalty details
- What you do
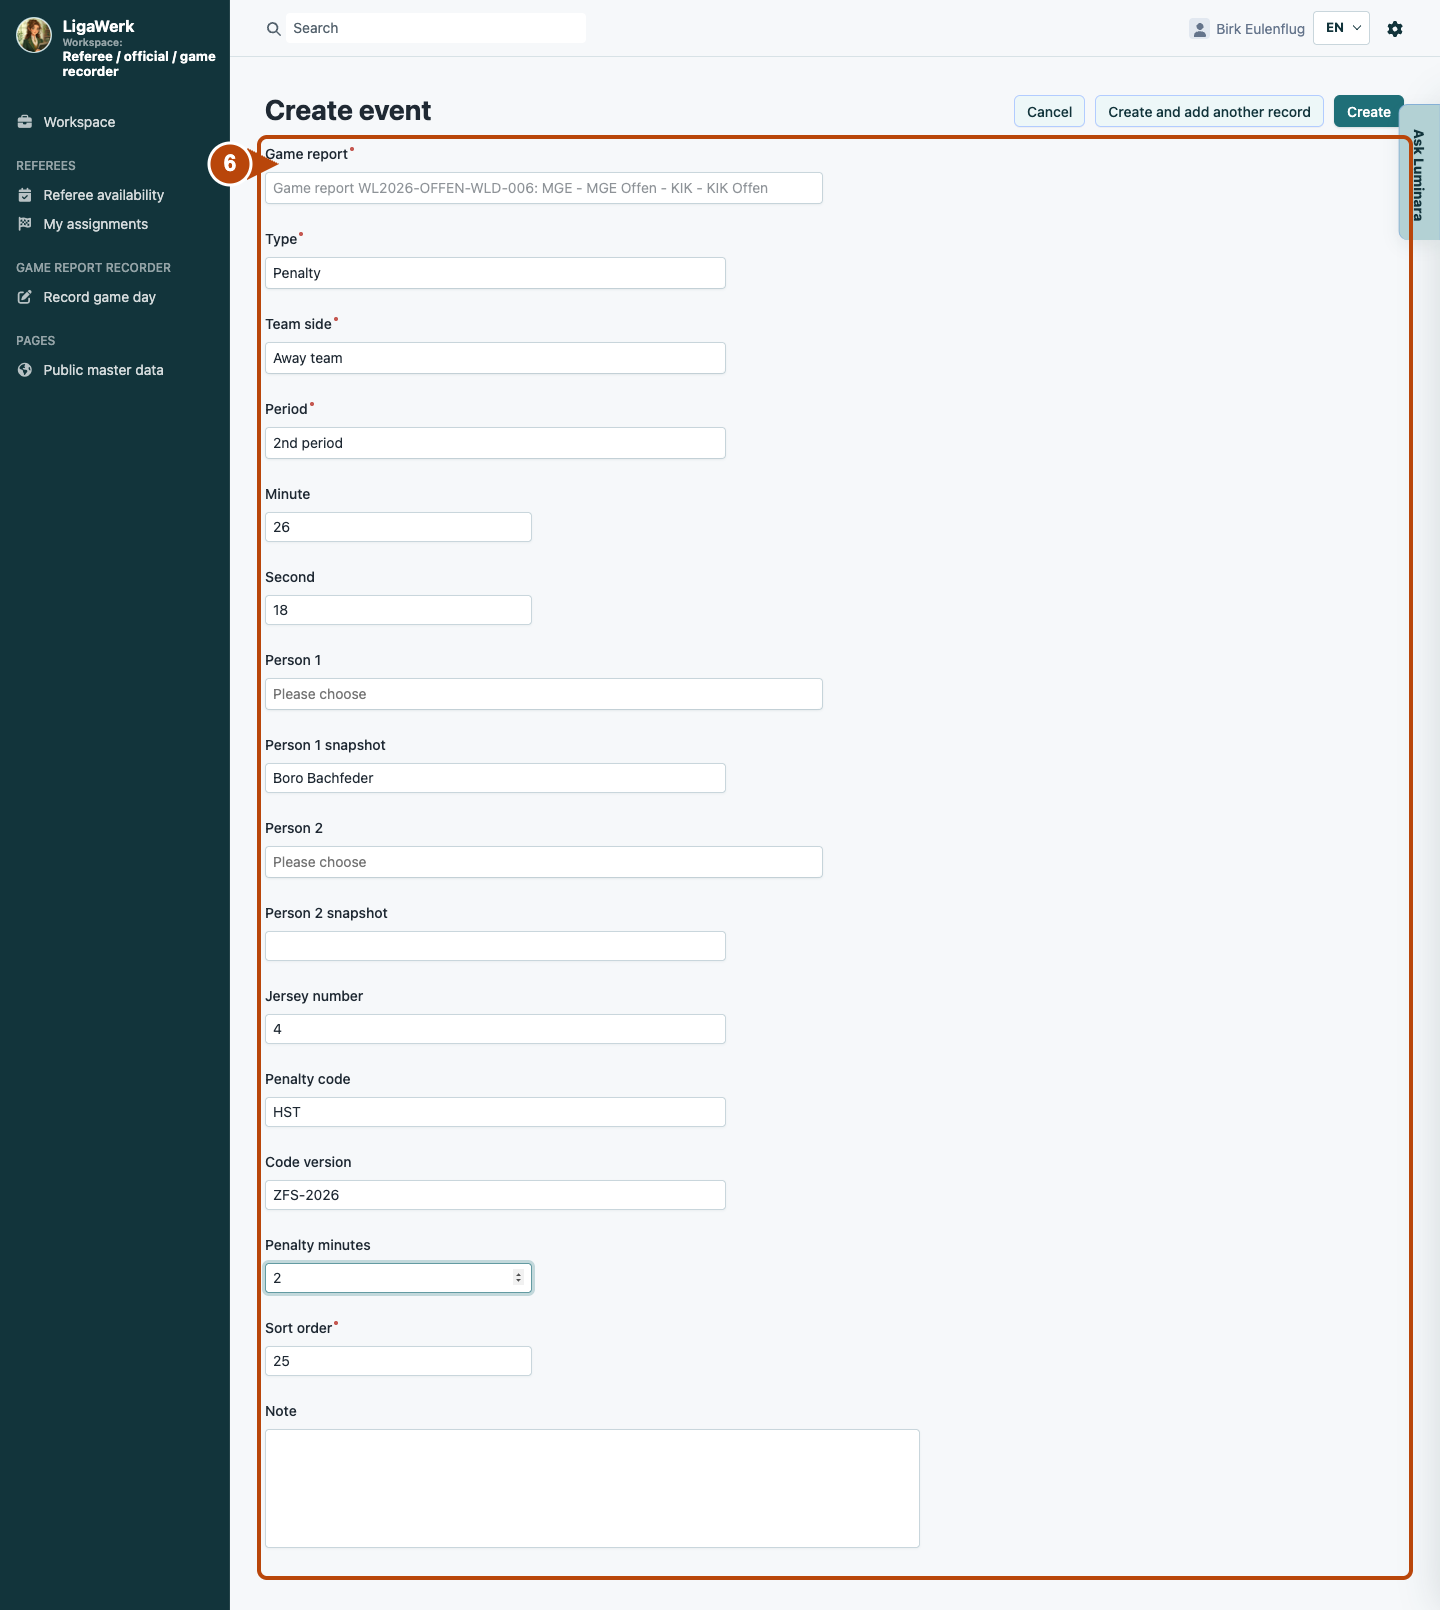
- Open a new event and select “Penalty”. Add the team side, period, time and affected person. Enter the confirmed “Penalty code”, applicable “Code version” and “Penalty minutes”. Save with “Create” and check the event list.
- How to recognise the result
- The penalty appears with its details in the report. The result image shows the saved goals, timeout and penalty; each event was created through its own form.
Number six frames the penalty event. A penalty code without a code version and positive penalty minutes is incomplete. The visible codes belong to this synthetic example, not a universally valid rule list.
View the saved events
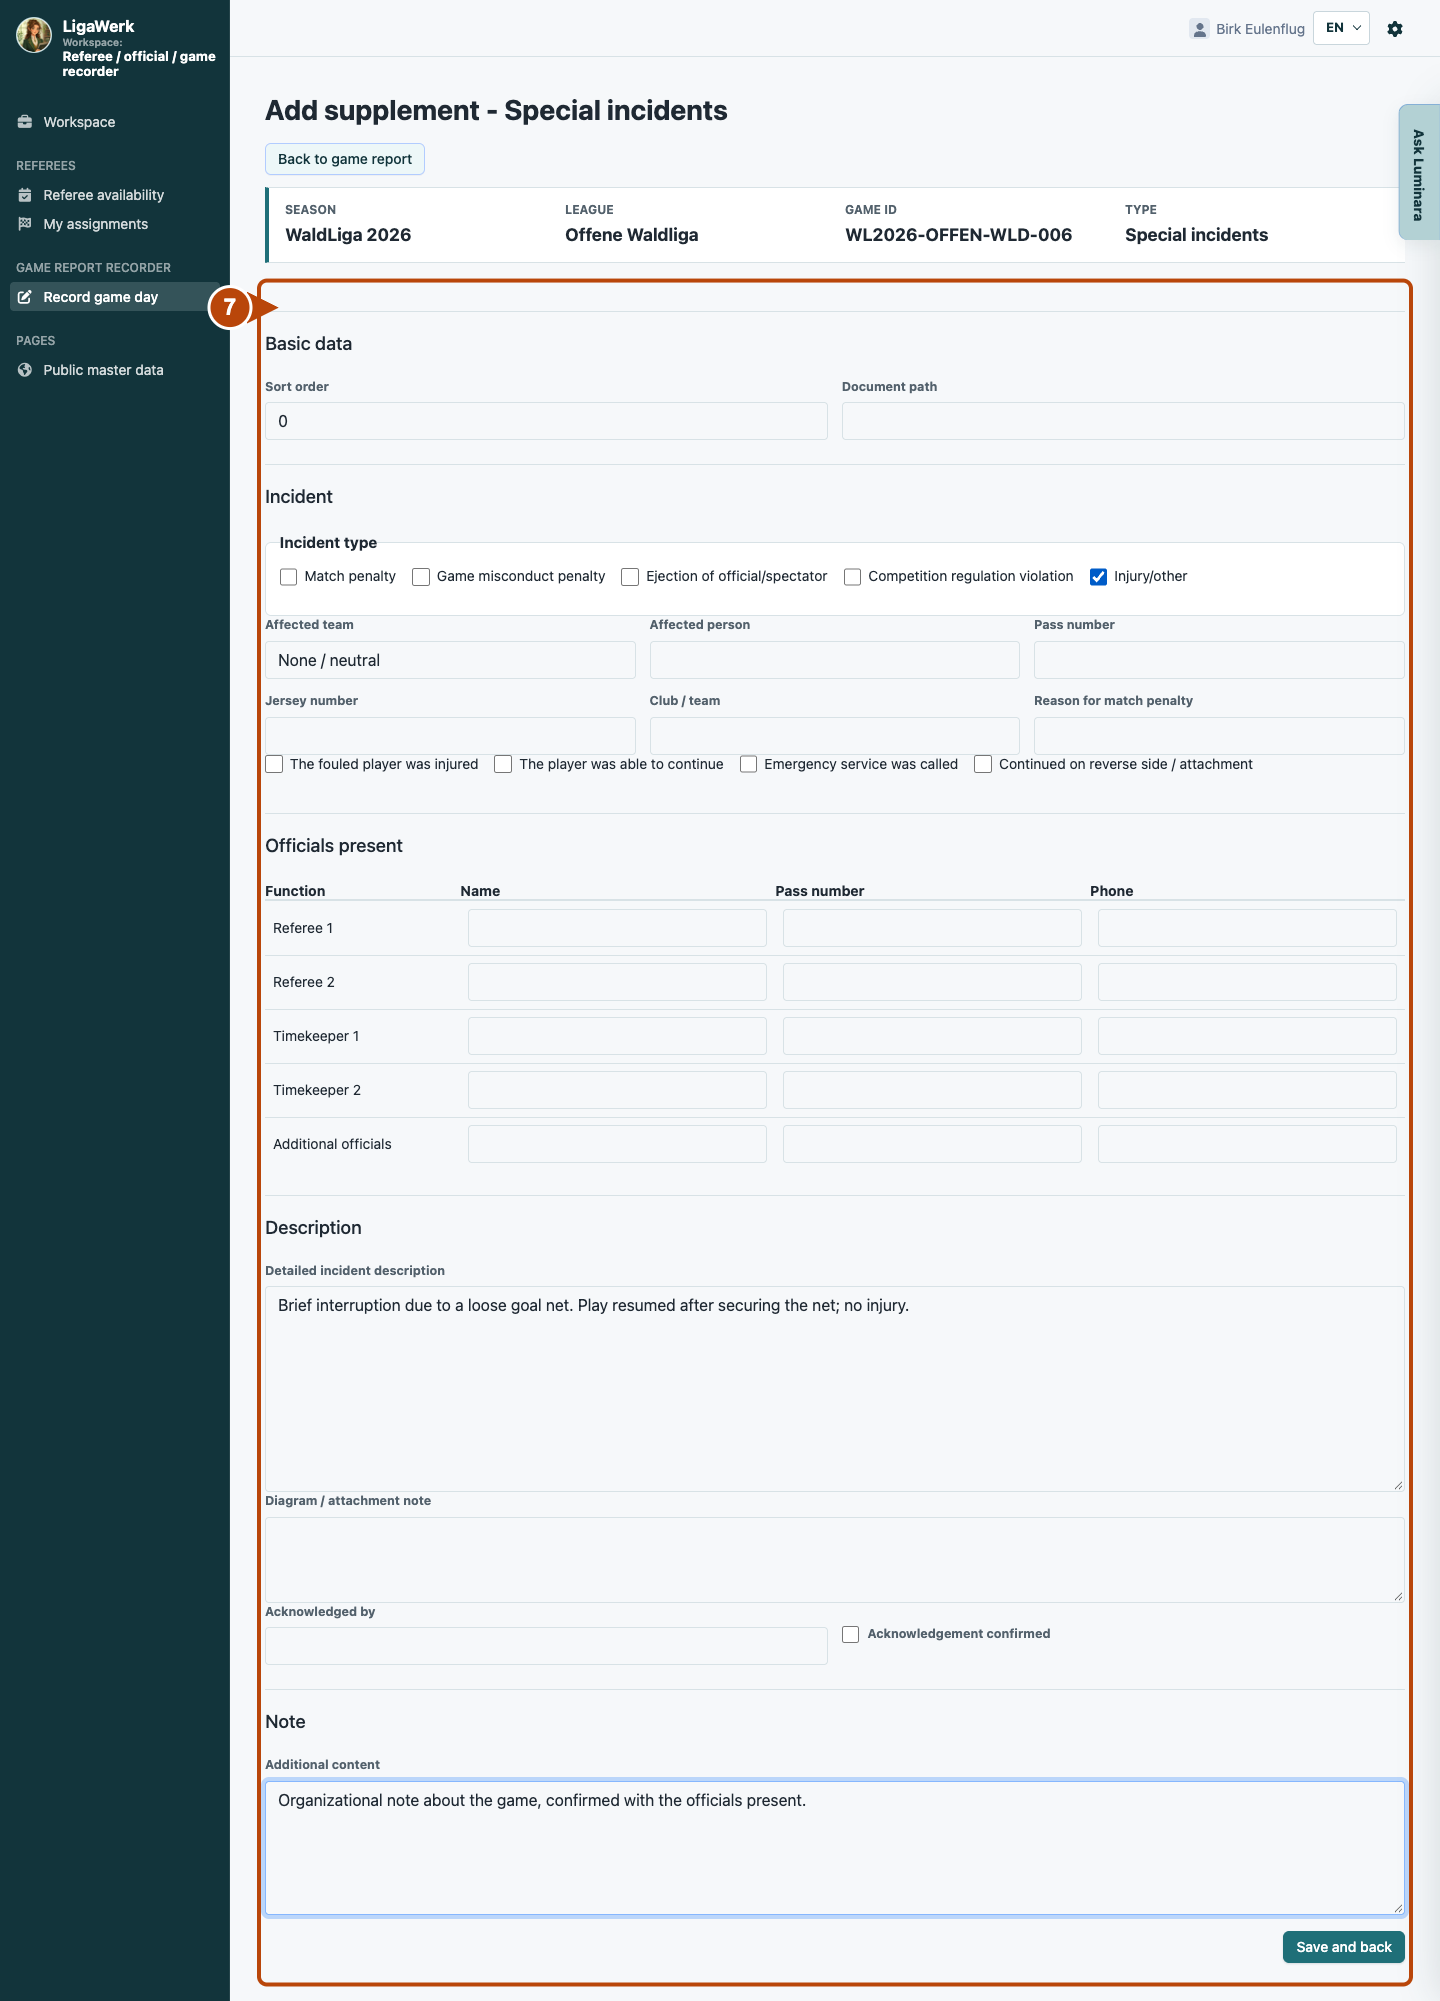
Game report workflow → Supplement sheets → Special incidents
7 · Add necessary supplementary information
- What you do
- Only choose the supplement the actual game requires. For “Special incidents”, select the appropriate category and describe the incident clearly. Add affected people and officials where relevant. Click “Save and back”.
- How to recognise the result
- The supplement appears with a summary in the report. This image shows the completed form before saving; the next full report view contains the saved example.
Number seven marks the full incident form. An ordinary goal or penalty is an event; additional information needs the appropriate supplement.
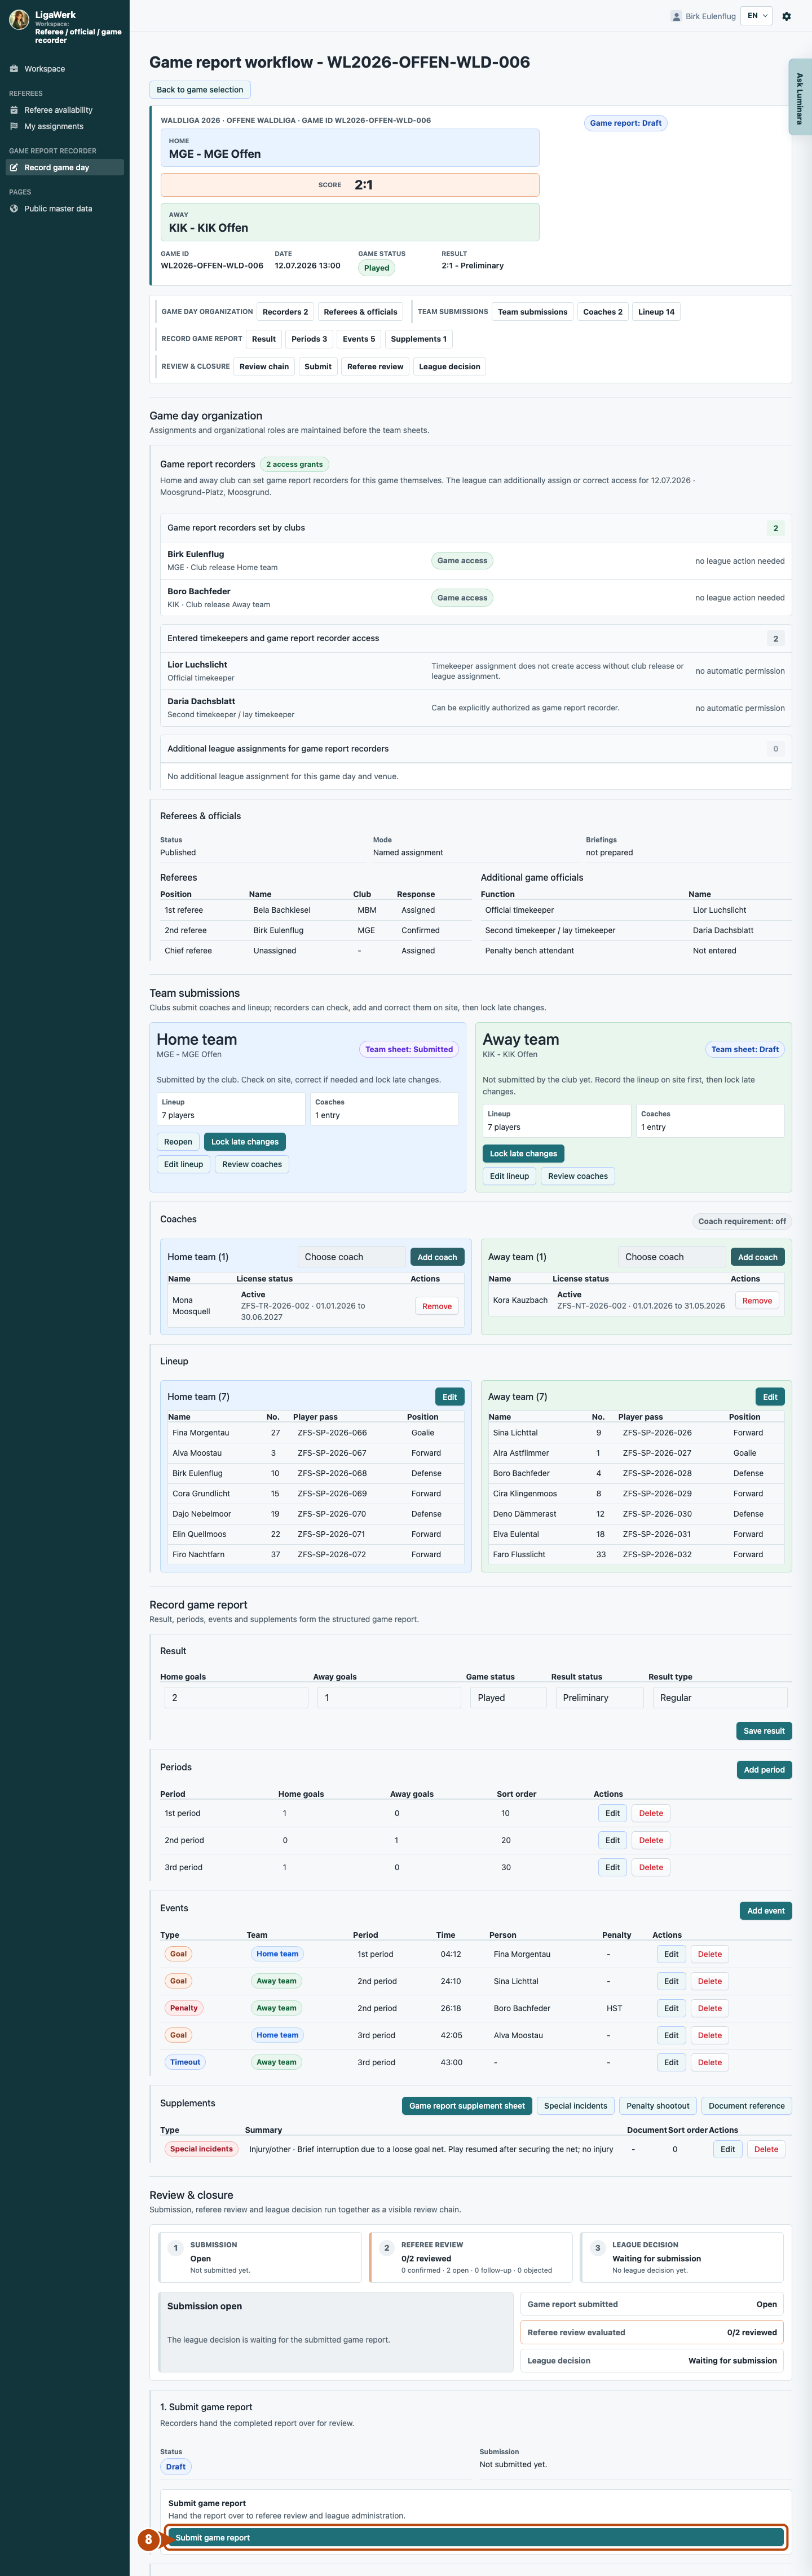
Game report workflow → Review & closure → Submit game report
8 · Check and submit the report
- What you do
- Compare the final score and periods, then check both team sheets, events and necessary supplements. Click “Submit game report”. Clarify incomplete information with the responsible participants first.
- How to recognise the result
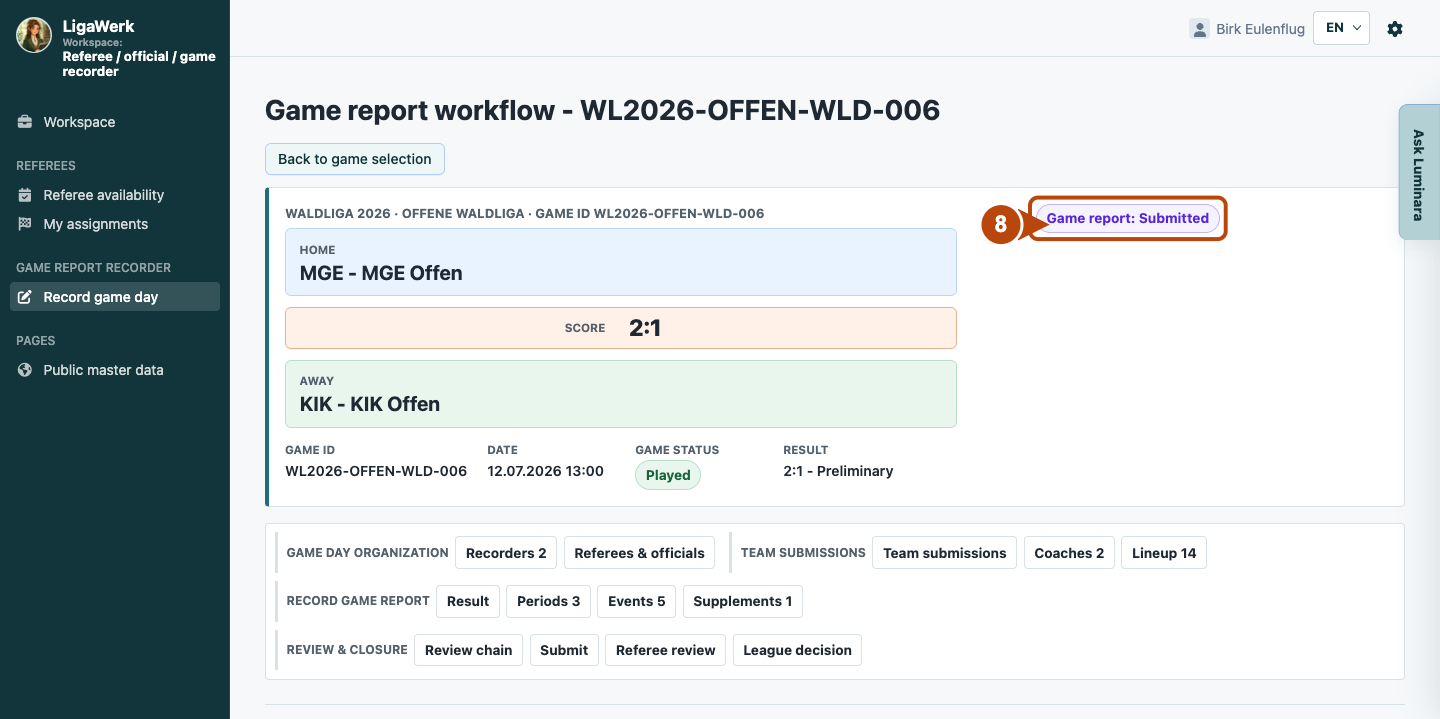
- After actual submission, the status changes to “Submitted”. The result image shows this status. Normal recording is then locked; changes require a correction request from league management and resubmission.
Number eight marks the submit button at the end of the full report. The view is deliberately long so all saved sections and the correct game remain recognizable. Submission is not final result approval.
View the submitted status
How to start in the demo
Game report recorder · You start signed in to “Record game day”. Open a game you are authorised to record with “Record” or “Create”. For a game-day/venue assignment, open the game day first.
The demo opens a new tab, signed in to the matching workspace. This explanation stays open.